
How to Make DIY Rustic Christmas Ornaments at Home: Complete Guide
You can make DIY rustic Christmas ornaments at home using simple materials like wood slices, twine, burlap, pinecones, and basic craft tools. You create rustic Christmas ornaments by combining natural materials with simple techniques like tying, gluing, painting, and layering to give each piece a handmade look.
When you use the right tools and easy methods, you can turn everyday items into ornaments that feel warm and timeless. Small details like stamped burlap, wrapped twine, or painted wood add texture without much cost or effort.
You will explore essential supplies, basic crafting steps, and popular ornament ideas that fit farmhouse and nature themes. You will also learn how to personalize each piece so your tree reflects your style and feels complete.
Essential Materials and Tools for Rustic Ornaments
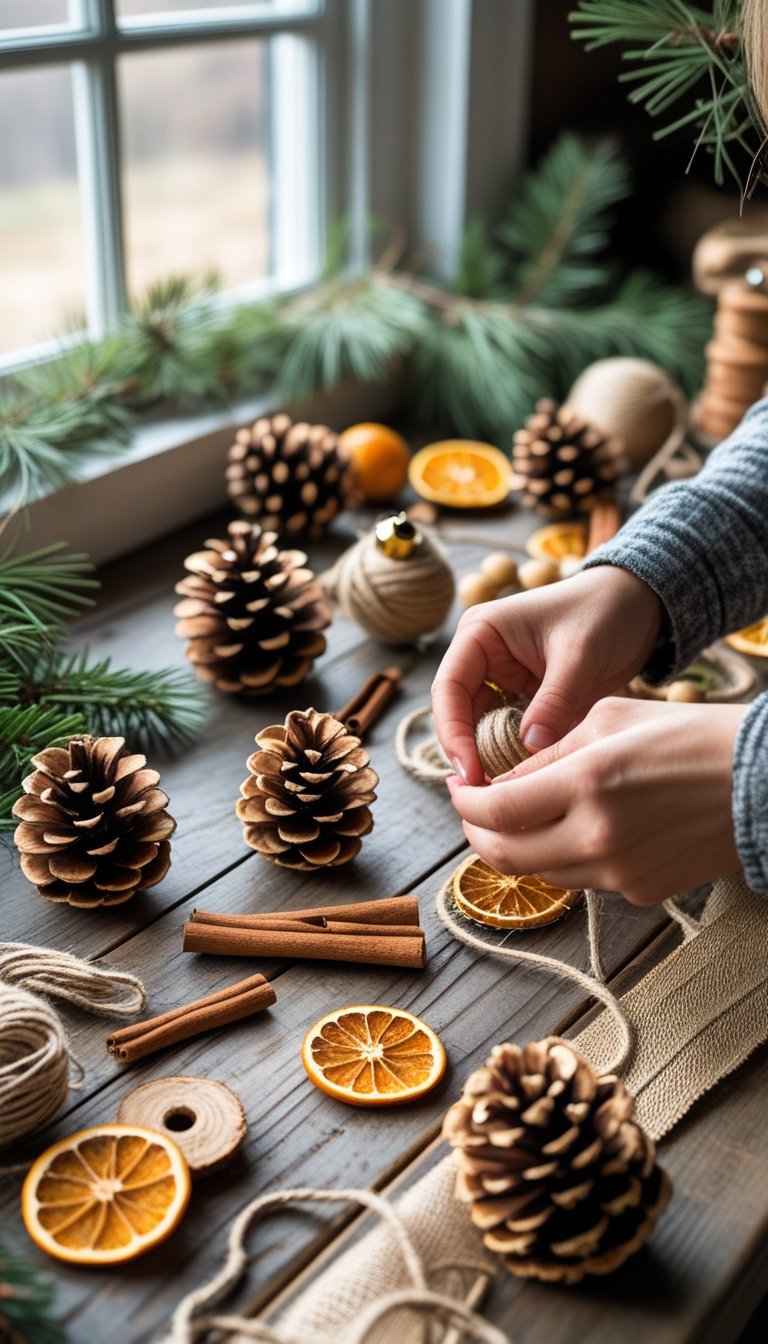
You create strong, lasting diy rustic christmas ornaments when you choose solid materials and reliable tools. Focus on natural textures, simple hand tools, and safe work habits to get clean results.
Choosing Natural and Recycled Materials
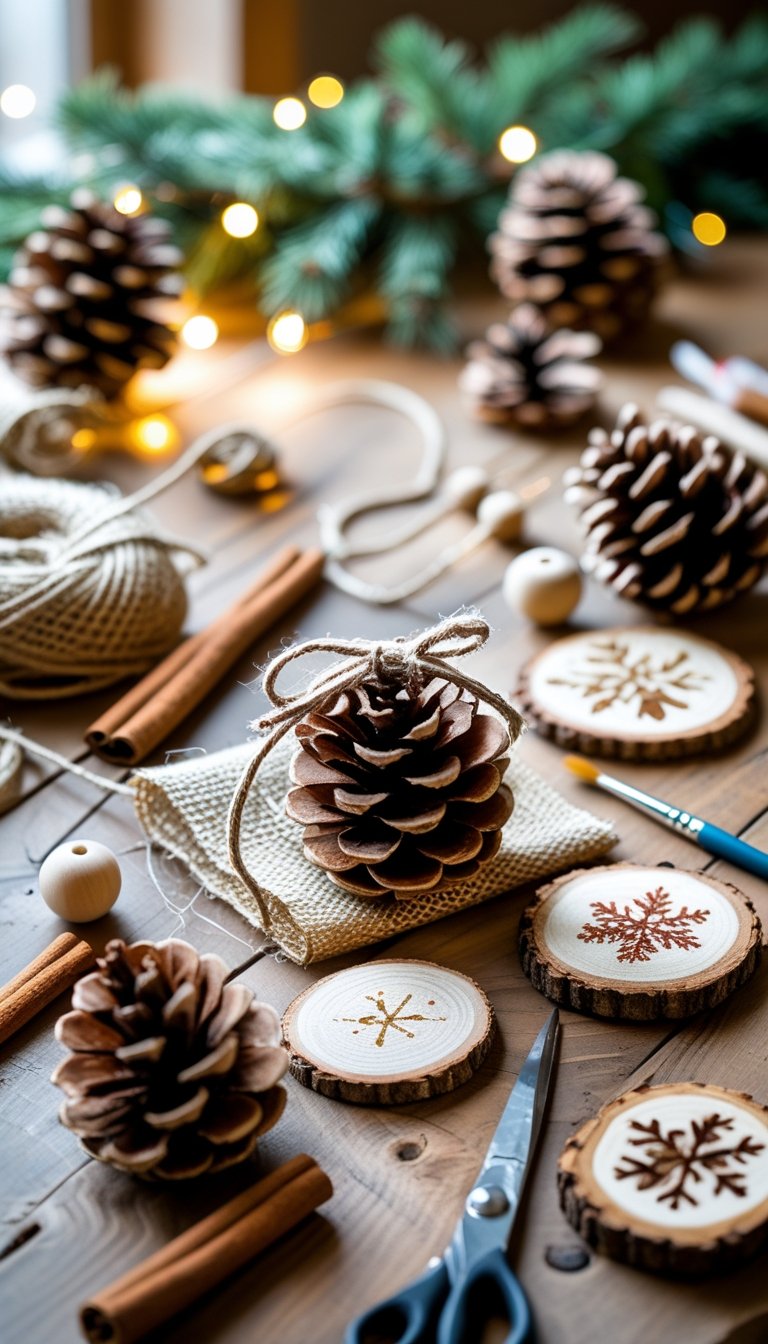
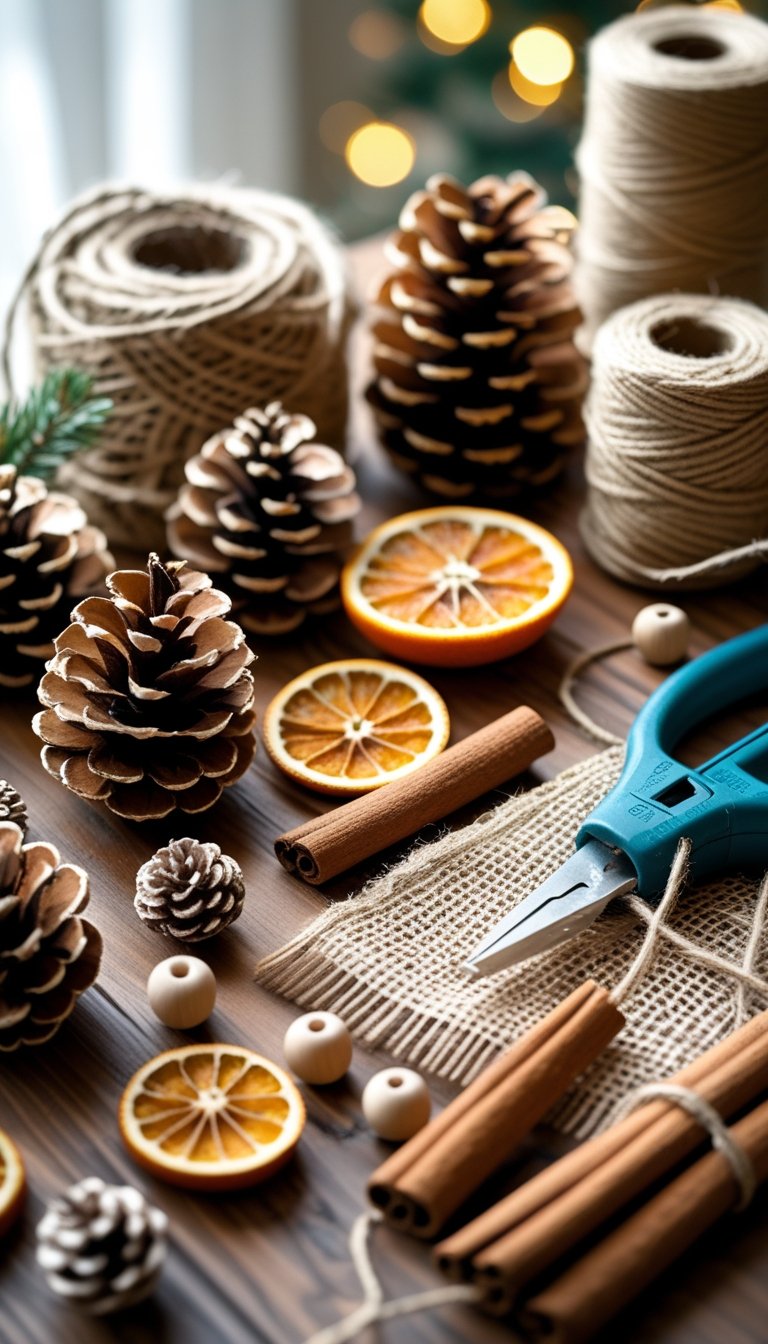
Start with materials that show texture and grain. Wood slices, small branches, bark pieces, and scrap lumber work well for rustic christmas ornaments. Choose dry wood with no soft spots or mold.
Add soft texture with jute twine, burlap, and cotton ribbon. These fibers hold knots well and give your diy christmas ornaments a handmade look. Avoid thin synthetic string because it can look shiny and out of place.
You can also reuse items from home. Old buttons, fabric scraps, and mason jar lids add character. Many makers use natural elements like pine cones, twine, and scrap wood in projects such as these DIY rustic Christmas ornaments.
Before you glue or paint anything, clean and dry each item. Brush off dirt and let damp pieces air dry for at least 24 hours.
Recommended Tools and Safety Tips
You do not need advanced equipment to make diy rustic christmas ornaments. A small set of basic tools will handle most tasks.
Common tools include:
- X-acto knife
- Hot glue gun
- Small hand saw
- Sandpaper (medium and fine grit)
- Paint brushes
Many wood projects also use simple crafting tools such as glue guns, paint brushes, and wood slices as shown in these DIY wood Christmas ornaments for a rustic holiday theme.
Work on a flat, stable table. Keep your fingers clear of blades and hot glue tips. Wear safety glasses when cutting or drilling wood.
Sand rough edges to prevent splinters. If you use spray sealers or paint, work in a well‑ventilated area.
Sourcing Wood, Twine, and Pine Cones
You can find most supplies close to home. Check your yard for fallen branches after storms. Choose solid pieces that feel dry and heavy for their size.
Craft stores sell pre-cut wood rounds, natural jute twine, and clean pine cones. Hardware stores carry affordable twine in larger rolls, which helps if you plan to make many diy christmas ornaments.
When collecting pine cones outdoors, shake out debris and bake them at low heat, around 200°F for 30 minutes. This helps remove moisture and insects.
For more project ideas that use wood, burlap, and twine, review these DIY farmhouse Christmas ornaments. Use what you already have first, then buy only what you need to complete your rustic christmas ornaments.
Basic Techniques for Creating DIY Rustic Ornaments
You create strong rustic ornaments when you cut clean shapes, use natural textures, and apply simple finishes that last. Focus on steady cuts, tight wrapping, and thin, even paint layers to get a neat result.
Cutting and Shaping Wood Slices
Wood slice ornaments give your tree a natural look. Start with dry wood slices that are about ¼ to ½ inch thick so they do not crack easily.
Sand both sides with medium grit sandpaper, then switch to fine grit for a smooth surface. Wipe off dust with a dry cloth before you paint or stain.
If you cut your own slices, use a hand saw and clamp the branch in place. Keep your cuts straight and even. Many crafters use simple branch rounds like those shown in these DIY wood Christmas ornaments for a rustic holiday theme.
Drill a small hole near the top for hanging. Keep it at least ½ inch from the edge to prevent splitting. Always drill slowly and support the back of the wood.
Working with Twine, Burlap, and Fabric
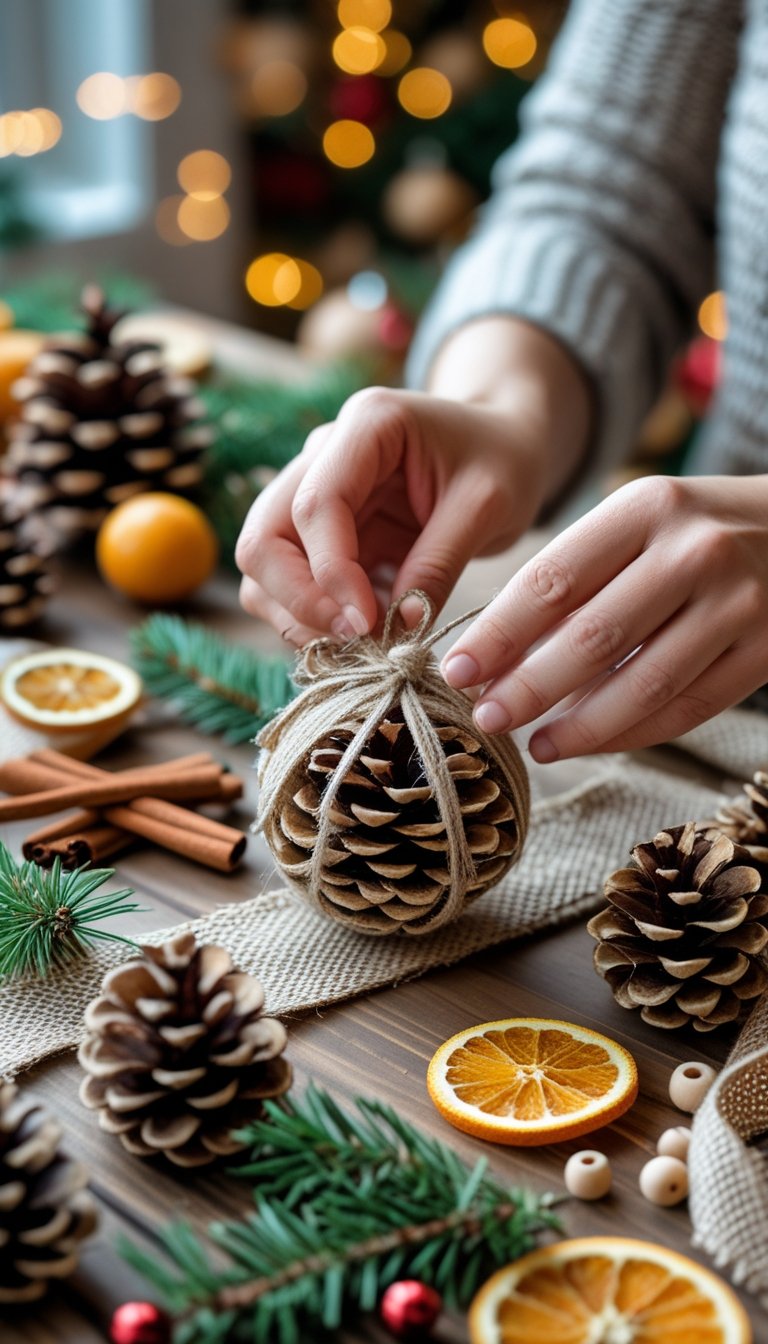
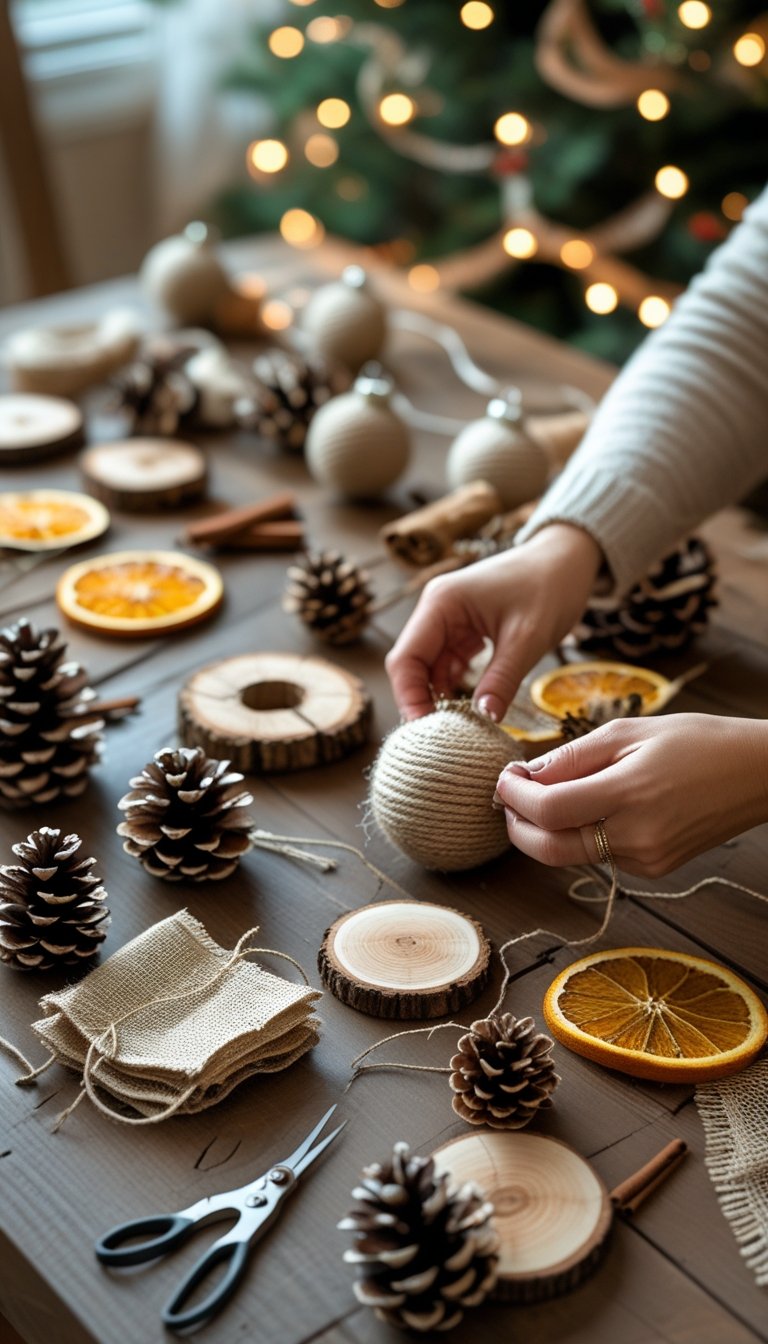
Twine ornaments add texture without much cost. Wrap jute twine tightly around a wood slice, foam ball, or cardboard shape. Add a small dot of hot glue every few inches to keep it secure.
For stamped burlap ornaments, cut burlap slightly larger than your base. Pull away loose threads from the edges for a rough but tidy look.
Press the burlap flat before stamping. Use acrylic paint and a simple rubber stamp, such as a snowflake or tree. Apply paint lightly to avoid bleeding through the fabric. You can see similar ideas in these DIY rustic Christmas ornaments using wood and twine.
When you work with fabric strips, knot them around sticks or dowels to form tree shapes. This method works well for handmade fabric tree ornaments like these easy homemade rustic Christmas ornaments.
Painting, Stamping, and Sealing Finishes
Use acrylic paint for most rustic ornaments. It dries fast and covers well on wood and burlap.
Apply thin coats with a flat brush. Let each layer dry before adding another. For a worn look, lightly sand the edges after the paint dries.
Stamp simple words like “Joy” or “Noel” in dark paint over a light background. Keep your design centered and measure before you stamp.
Seal wood slice ornaments with a clear matte sealer. Brush on a thin layer to protect the paint and prevent moisture damage. Let the ornament dry fully before you add twine or ribbon for hanging.
Popular DIY Rustic Christmas Ornament Ideas
You can turn simple household items and natural materials into ornaments that look warm and handmade. Clothespins, pine cones, acorn caps, and flannel fabric all give your tree a rustic style without high cost.
Clothespin Snowflake Ornaments
You can make a clothespin snowflake with basic wooden clothespins and glue. Start by pulling apart 8 to 12 clothespins and removing the metal springs. Glue the flat sides together to form “V” shapes.
Arrange the pieces in a circle to create even points. Adjust spacing before the glue dries so your snowflake stays balanced.
Once dry, paint or stain the wood. White paint gives a clean winter look, while light gray or soft blue adds contrast. You can also brush on a thin coat of wood stain for a natural finish.
Add small details if you want:
- A light dusting of glitter
- Tiny buttons or beads in the center
- Twine for hanging
For more variations and step ideas, explore these DIY rustic Christmas ornaments. Clothespin snowflakes are lightweight, easy to store, and simple to make in batches.
Pine Cone and Acorn Cap Ornaments
A pine cone ornament brings natural texture to your tree. Collect pine cones from your yard or buy clean, dry ones from a craft store. Rinse and bake them at low heat to remove dirt and insects before decorating.
You can leave the pine cones plain or brush white paint on the tips for a snow effect. Tie twine or jute string around the top scales to create a hanger.
An acorn cap ornament works well as a small accent. Glue a wooden bead, pom-pom, or felt ball inside a clean acorn cap. Attach twine to the top with strong craft glue.
These materials fit well with other rustic Christmas decor ideas. They cost little and use items you may already have at home.
Rustic Flannel Star Ornaments
A rustic flannel star ornament adds soft texture and color. Choose flannel in plaid or solid red, green, or cream. Trace a simple five-point star on the fabric and cut out two matching pieces.
Sew around the edges with a basic running stitch, leaving a small opening. Stuff lightly with cotton or scrap fabric to give it shape. Then close the seam.
If you prefer not to sew, use fabric glue around the edges. Press firmly and let it dry flat.
Finish with simple details:
- Stitch a wooden button in the center
- Wrap twine around one point for hanging
- Lightly sand edges for a worn look
These stars match well with other handmade pieces and create a cozy, farmhouse feel on your tree.
Twine, Burlap, and Ribbon Ornament Projects

You can create rustic ornaments with simple materials like jute twine, burlap fabric, and basic ribbon. These projects rely on wrapping, shaping, and light decorating to give your tree a natural farmhouse look.
DIY Twine Ball Ornaments
You can make classic twine ball ornaments with just string, glue, and a round base. Many crafters follow guides like this DIY twine ball ornament tutorial to shape clean, even spheres.
Start with a small balloon or foam ball. Wrap jute twine around it in different directions until you cover most of the surface.
Brush white glue or Mod Podge over the twine as you work. Let it dry fully before popping the balloon if you used one.
For extra texture, you can follow ideas like these DIY twine ball ornaments with Mod Podge and add light glitter or a thin ribbon bow. Keep decorations simple so the twine stays the focus.
Attach a loop of twine at the top for hanging. Use a strong knot and a small dot of hot glue to secure it.
Ribbon Angel Ornaments
You can turn ribbon and burlap into simple ribbon angel ornaments. The key parts are a small wooden bead for the head, wide ribbon or burlap for the body, and thin ribbon for hanging.
Cut a rectangle of burlap or ribbon about 6 inches long. Gather the top around the bead and secure it tightly with string or a small rubber band.
Shape the body by trimming the bottom edge straight. Glue a strip of lace or thin ribbon around the waist to hide the tie.
For a more rustic style, follow the materials listed in these burlap angel ornaments and use twigs or wire for wings. Glue the wings to the back and keep them centered.
Finish by gluing a thin loop of ribbon to the back of the head. Keep the design balanced and avoid heavy decorations.
Stamped Burlap Ornaments
Stamped burlap ornaments give you a flat, clean design that still feels rustic. You can cut burlap into circles, stars, or simple squares.
Glue the burlap over a foam ball or mason jar lid. Ideas like these DIY rustic burlap Christmas ornaments show how to use twine for edging and hanging loops.
Once the glue dries, stamp letters or simple shapes with acrylic paint. Use small sponge brushes or letter stamps for clear lines.
Keep your words short, such as:
- Joy
- Peace
- Noel
- Hope
Let the paint dry before adding twine bows or small bells. This method keeps the ornament light, easy to hang, and consistent with a rustic theme.
Farmhouse and Nature-Inspired Ornament Designs
You can create rustic DIY Christmas ornaments with wood, twine, pinecones, and other natural items. These designs fit well with diy farmhouse Christmas and simple farmhouse Christmas decor.
Wood Candle Holders and Rustic DIY Decor
You can turn small wood candle holders into sturdy, eye-catching ornaments. Choose unfinished holders in simple shapes like rounds or short columns.
Drill a small hole through the top or screw in a metal eye hook. Thread jute twine through the hole to create a strong hanger.
Paint the base in soft white, cream, or muted green. Lightly sand the edges to distress the finish and give it a worn look that suits rustic diy Christmas style.
You can also glue small wood cutouts, like stars or trees, to the front. Keep details flat and simple so the ornament hangs straight.
For more ideas that use wood slices and farmhouse themes, review these DIY farmhouse Christmas ornaments made from wood and twine. Focus on natural grain, neutral colors, and clean shapes to keep the design consistent with farmhouse Christmas decor.
Upcycled and Found Object Ornaments
You can make strong farmhouse Christmas decor using items you already own. Look for mason jar lids, scrap fabric, old buttons, and twigs.
Paint mason jar lids white and add simple snowman faces or stencil letters. Glue a loop of twine to the back for hanging.
Wrap leftover burlap or ticking fabric around clear plastic ornaments. Secure the fabric with hot glue and tie a small bow at the top.
You can also collect pinecones and dust the tips with white paint for a snow effect. Many nature-based ideas use pinecones, berries, and twigs for simple designs, as shown in these nature-inspired homemade Christmas decorations.
Focus on sturdy materials and tight knots. Check that each ornament hangs straight and feels balanced before placing it on your tree.
Creative Personalization and Unique Ornament Variations

You can turn simple rustic diy ornaments into keepsakes that reflect your family and traditions. Add names, photos, or classic holiday shapes to make each piece feel personal and distinct.
Photo Transfer and Monogram Ornaments
You can add meaning to rustic wood slices or clay shapes with a photo transfer. Print a black and white photo using a laser printer. Brush a thin, even layer of matte Mod Podge onto the wood, press the photo face down, and let it dry overnight.
The next day, dampen the paper and rub it off with your fingers. The image will stay on the wood and create a soft, worn look that fits rustic decor.
For monograms, paint or stain the base first. Then use one of these methods:
- Stencil and acrylic paint for clean, bold letters
- Wood burning tools for a carved effect
- Vinyl letters for sharp edges and quick results
Seal each ornament with a clear matte sealer. Add twine or thin jute rope to keep the natural style consistent.
Candy Cane and Themed Character Ornaments
You can shape rustic diy ornaments into classic candy cane ornaments using wire wrapped with red and white yarn. Bend the wire into a hook shape first, then wrap tightly to avoid gaps. Secure the ends with hot glue.
For a wood version, cut a candy cane shape from thin plywood. Paint it in muted red and off white instead of bright tones to match a rustic tree.
Themed character ornaments also work well with simple materials. Cut basic shapes from wood slices or thick felt and keep details minimal. For example:
- Use twine for scarves or bows
- Add small buttons for eyes
- Paint simple outlines instead of detailed faces
If you want more themed inspiration, you can explore ideas from 71 Unique DIY Christmas Ornaments to Personalize Your Tree. Keep your designs simple and handmade so they blend with your rustic style instead of overpowering it.